
 Painting Workshop: May 21...
  Personalized Hand Drawn a...
  Dangle Necklace Scarf
 Month: August 2018
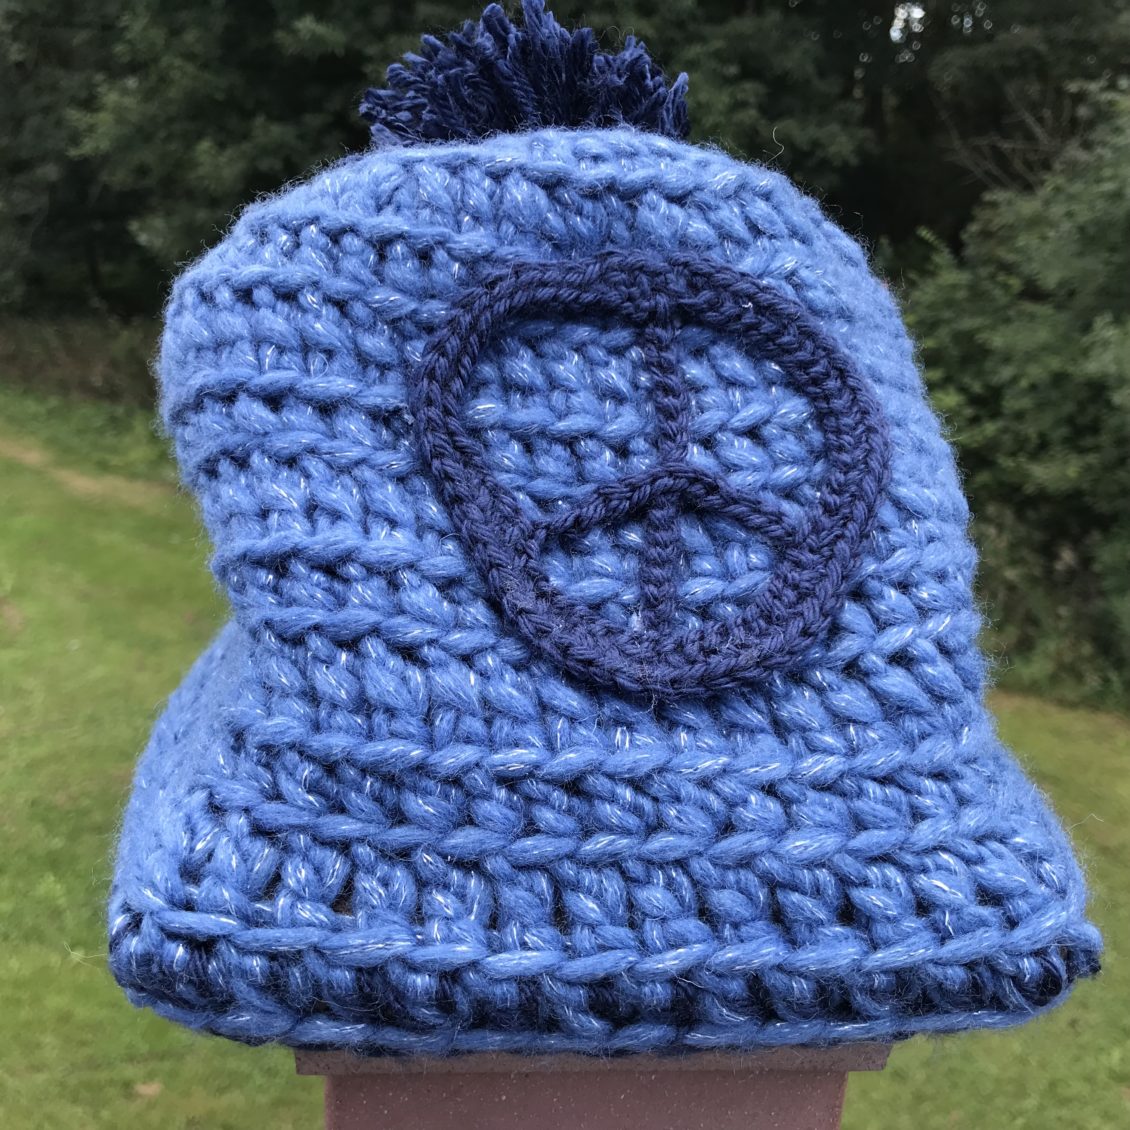
#hatnothate: The Peace of Mind Hat
As I sat here designing and redesigning my hat for #hatnothate again and again, I could not help but think of my own youth and the times I have been bullied. It’s hard, really, to not think of those times when the subject comes up. I am, however, thankful, when I hear the horror stories of others that my own experiences with bullying were rather mild in comparison. Nonetheless, no matter the mildness of the bullying, it should not go unnoticed, overlooked, ignored, and, possibly most importantly, never treated as fault of the person who is being bullied. Regarding the latter, I hear the phrase “you need to toughen up” so often…too often. Perhaps it is true that some “will never make it in this world if they don’t get thicker skin”, but what a horrible world we live in if that is the absolute case and there is no reason it should be that way!
In my own youth, I came across children you no longer wanted to be friends with me because I was “weird” or because I cried about getting my good clothes dirty because I feared my mother’s reaction—I was labeled a cry baby and told that no one would be my friend because of it. This was of course all in elementary school. By the time I reached middle, I encountered the misfortune of the real life version of the telephone game where you tell someone one thing and by the time it gets down the line, the person you hear it retold has a very different or twisted version of what you said originally. I was nearly beaten up over that one—just got shoved and pinned up against the girls’ bathroom wall with a threatening fist in my face. Somehow I managed to explain the situation and convinced the other girl that what she heard was not what I had said. She at least listened to me. I know others have not been so fortunate to have their bullies listen.
It frightens me to no end, now that my daughter is beginning first grade. I worry about her encounters with bullying. It can begin so early. She has already begun to encounter some forcefulness from a friend, telling her she cannot play with anyone else but this friend. My daughter has actually hid from this girl to try to get a chance to play with someone else at recess. It breaks my heart. In her favor, she is a very strong, confident, and independent girl. However, I do know that the more you experience bullying the more it can break down your confidence. I can only hope that with our active presence in her life, we can help her overcome these obstacles.
I can go on and on about bullying, as I know many others could. We have all encountered bullying in some form—even the bullies themselves have been bullied. Whether it is from family or friends or acquaintances, bullying happens in many forms. Something I realized recently, as I witnessed an encounter my daughter had with someone we know well, is that some bullies don’t even realize they are bullies. They think they are being cute or funny when in reality they are being mean, demeaning the other with insensitive words.
We must think before we speak. Try to understand who and why someone might be hurt by the things we say and do. We must create a peace of mind around us to help improve the world—hate only begets hate.
This is why I made this hat, for my daughter, for myself, for all of you! Please take this pattern and make it with love and confidence that you are loved and not the only one out there. We can help each other be better, be stronger, be a peacemaker.
Yarns: Bernat Dazzle Blue Sky Shine and Caron Simply Soft Dark Country Blue
Pattern:
Yarns: 1 ball Bernat Dazzle in Blue Sky Shine and Caron Simply Soft in Dark Country Blue
Hook: 8mm (US 11) and 4.5mm (US H-8)
Other Materiels: large eyed embroidery needle, scissors, tools typically used for making pompom (5” wide cardboard with slit cut out halfway in center is useful or just your hand)
Terms:
CH = chain
dc= double crochet
hdc = half double crochet
sl st = slip stitch
st = stitch
Magic circle = wrap yarn around center fingers with end tail by thumb and joining ball toward ring finger, keeping the latter wrap toward back of hand and first string at front. Slide hook under 1st string between pointer and middle finger then over top of back string, hooking it and pulling it under 1st string. Slightly twist as you pull it up and remove from hand. Chain and st around the circle needed amount. Then pull end tail to tighten circle.
Starting with Bernat yarn
R1: Magic Circle (if unfamiliar with the magic circle, using a starting chain of 4 and moving directly to the hdc works also) leaving a long tail for knotting to pompom later, ch 2, hdc 11 around the circle, sl st at top of ch2.
R2: Ch3, dc into same st, 2dc in next st, 2dc in each st to starting ch, sl st to ch3 to join. (24dc)
R3: CH3, dc into same st, *dc in next , 2 dc in next st, Repeat from * to starting chain, join with sl st. (36dc)
R4: CH3, dc into same st, *dc in next 2 sts , 2 dc in next st, Repeat from * to starting chain, join with sl st. (48dc)
*For Larger Hat: Add an additional row of dc increases–Ch3, dc into same st, *dc in next 3 sts, 2 dc in next st, Repeat from * to starting ch, join with sl st.
R6: Ch2, hdc in next st, continue hdcs to end, join with sl st
R7: Ch3, dc in next st, continue dcs to end, join with sl st.
R8-13: Repeat rows 6 & 7.
*At end of R7, when joining with sl st, bring Caron Simply Soft (CSS) yarn on hook with the Bernat to join.
R14: With both yarns on hook, Ch2, hdc to end, join with sl st.
R15: Dropping the Bernat yarn from hook, keeping the CSS on, Ch1, sc in same st, sc to end, join with sl st and fasten off.
PomPom (optional)
Make a pompom using the Caron Simply Soft Dark Country Blue.
Using preferred tool, cut an 18” long yarn from CSS, drape in middle of slit as shown in figure for the tail and fastener. Taking yarn from ball, begin to wrap it around the cardboard in the opposite direction of the tail yarn. Wrap around until desired thickness (I stopped around ¼” to ½” thick). Taking tail yarn, fasten it around the center of wrapped area, knotting it several times. You may want to slip it off the cardboard before making first knot to make it tighter. Cut both ends of looped yarn and trim around for neater pompom look.
Using large eyed needle, thread the tails of pompom through center hole at top. Tie in knot with tail from start of magic circle. Thread in all ends.
Peace Symbol:
I did each as a separate peace to get the best result of evenness of circle. Then used fabirc to stick it and a few stitches to give extra security.
Outer Circle: Using Caron Simply Soft Country Blue and size 4.0mm hook, Ch52, join circle with sl st. Ch1, sc in same st, sc to end. Fasten off.
Inner Center line: Ch16, Fasten off.
Center Cross lines: Ch 10, FAsten off.
Glue down circle. I like the look of the center line on top, so I carefully lined up the center line first gluing the top portion down a little, then placed the cross line underneath with glue and finished gluing the top center line. I put a book on top to keep it fast down on the hat while it dried. Once dried I added a few stitches around to secure it more. Sew in all the ends. You may either attach to center of hat using embroidery thread or with fabric glue or both for extra security.
I hope this hat helps bring more awareness and peace of mind to all!
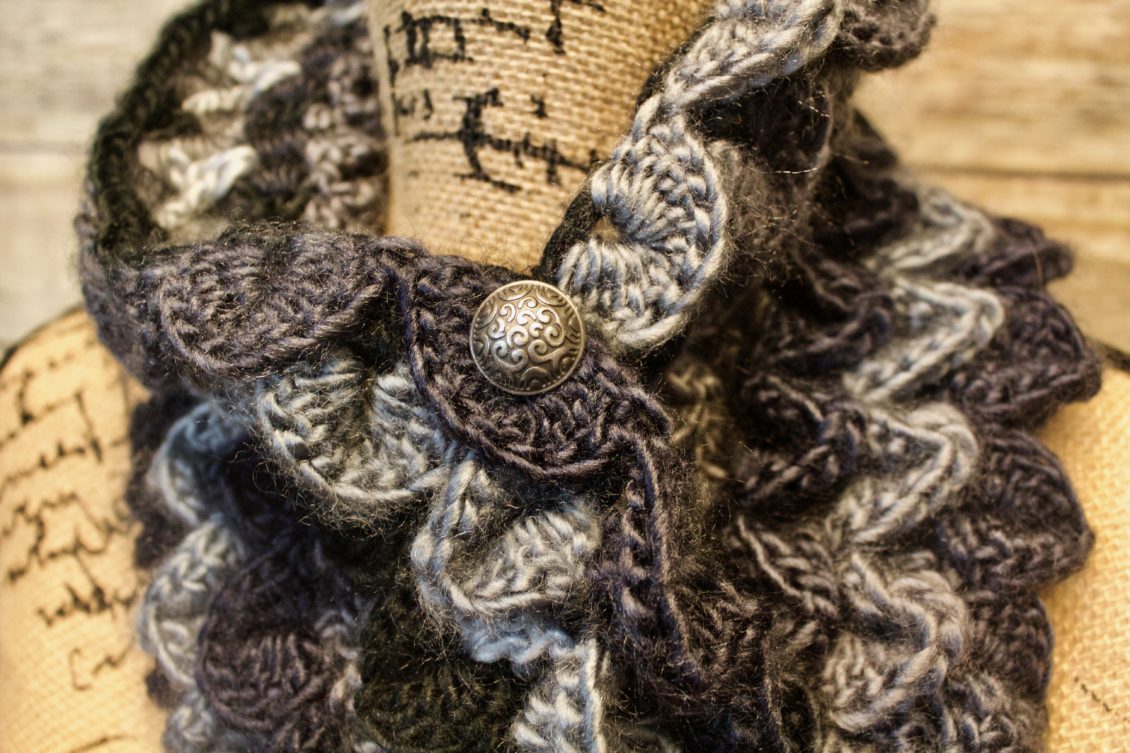
The Crocodile Stitch: Dragon Scale Neck Warmer
With the popularity of shows such as Game of Thrones and others from a similar genre, the dragon scale, or crocodile stitch has also surfaced in popularity. No doubt, using the right yarn and with the right pattern, you can create an awesome design that will get many a compliment no matter what shows are trending.
Finding and creating the right design, however, can be tricky. I wanted to make a simple yet elegant cowl using this stitch. Sometimes when trying to come up with a design, I will see what already exists and just use that; but more often than not, for my personal style, I have something already in my head and it rarely exists outside of that. This was one of the great motivating factors for me when I started crafting and creating my own designs. And so I had to come up with my own pattern for an elegant dragon scale neck warmer. As the saying goes: If you can’t find it, make it!
The Simple: The crocodile stitch is not exactly simple. At first attempt, it can be rather confusing. But once you have the basics, it becomes a lot simpler. As with most designs, it’s made up of some standard stitches. It’s no different with the crocodile, which uses chains (ch) and double crochets (dc). It’s how you put them all together that gives the stitch its unique look.
One of the important parts to this stitch is that it has a foundation or base row. This foundation is made up of v-stitches. The number of v-stitches you have is important, of course, in order to make a balanced pattern of stitches. For every scale visible on the right side of the pattern, there is an additional v-stitch. In other words, you need two v-stitches for each scale you want in your pattern. When I designed this pattern, determining my starting length was essential in order to have the correct number of chains to get the correct number of v-stitches for my foundation row.
Let’s start with understanding the v-stitch. For this stitch you need to have 3 base stitches for each V. And of course for the starting V, you need to have 3 chains to count as the first dc that makes up the V plus 1 more for the space at the top of the V (between the 2 dcs).
Once you have the correct number of v-stitches you can start creating the actual scale. The scale is made up of several dcs worked around the V. The first V worked will start with a ch3 as many starting rows do followed by working the rest of the dcs around the first leg (or dc) of the V. After you have 5 dcs wrapped around the V leg, you ch1 or 2 (depending on the shape of the scale you desire—2chs creates a more pointing scale). Turning your work slightly to access the 2nd leg of the V, you will work another 5 dc around this leg. And, VOILA!, you now have a scale!
Now back to the point I made about having 2 v-stitches for every scale. You just made a scale around one V; however, the very next V you will skip. Each skipped V creates enough space between each scale allowing them to be nicely spaced apart, so they don’t bunch up on each other. At the same time, each row of scales staggers creating the overlapping scale effect. Those extra v-stitches are used to create the next rows scales.
Simple right?!
The Elegant: Creating the right pattern for your piece is the next challenge. For this scarf, I wanted to keep it light and simple; to make sure it was something that might even fit in a purse while still able to keep your neck warm. With this in mind I decided to keep it short, but making the pattern simple enough to create a longer scarf without having to determine extra pattern design.
Once I established my base pattern, it was time to choose the best yarn. This is often the make or break of a great pattern. There are plenty of great yarns out there that would be great for this pattern, but I decided to choose Lion Brand’s Landscape yarn in Metropolis. It served the perfect purpose of the scales and elegance I was looking for.
Once completed, I was in love! It looks amazing not only under the collar of your coat but also alone over your outfit for the evening.
To check out this pattern, I am offering it free with sign up to my email list or click this link to purchase directly here.
Use What You’ve Got!
As any geek knows, when there is something new to learn about their passion, they get excited about it and can’t wait to try it. Sometimes delayed gratification is too much to bear when one is anxious about said new skill, trick, toy, game…whatever it is one is geeking out about.
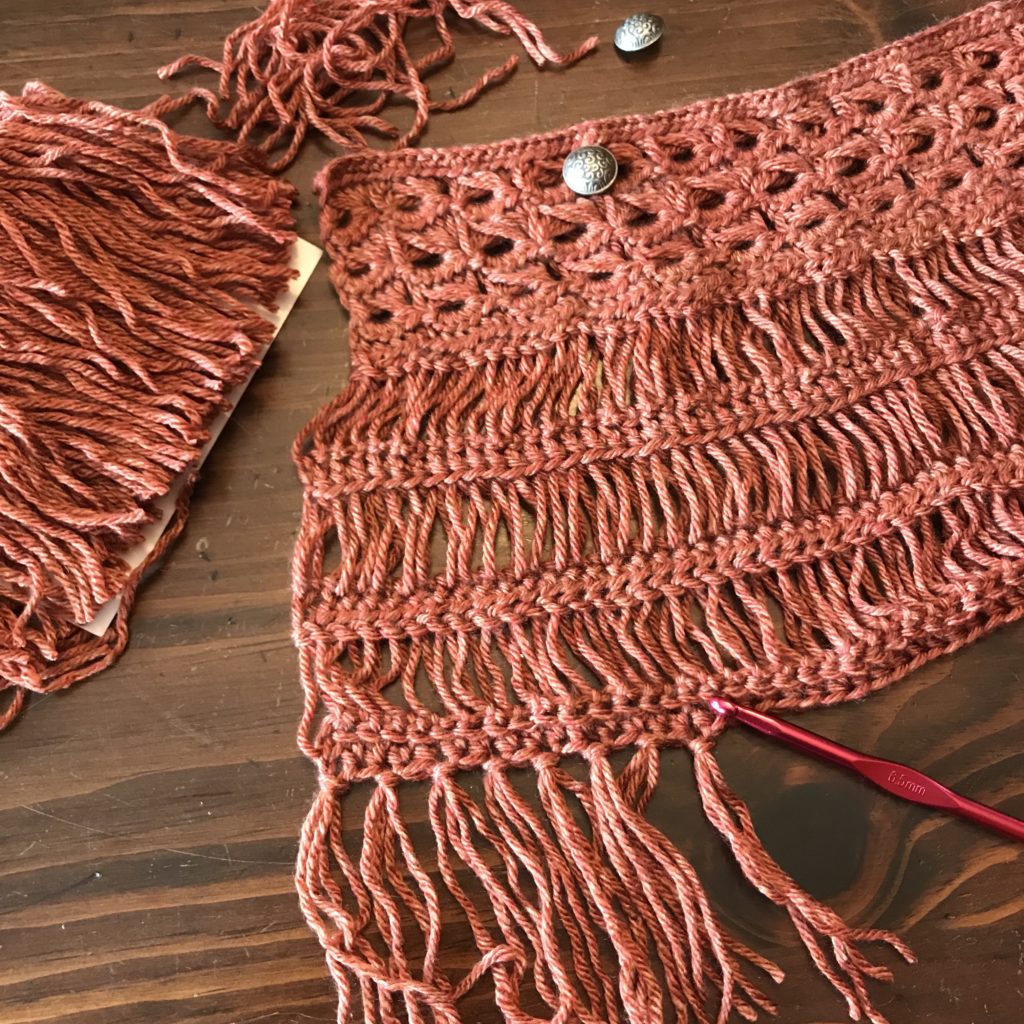
I am definitely in the category of one who is unable to wait. Fall season was just around the corner, and I wanted to make a cozy shawl that was lacy yet warm. I had just learned about the broomstick stitch, so naturally I was getting excited about the idea of creating something with it. Only I didn’t have the proper sized needle (width or length) or even a broomstick with a smooth round end I could slip yarn over. All the brooms I own have plastic jobbies over the handle that could catch and snag the yarn—not good if I hope to sell this creation.
I went on a hunt. Searching up and down and all around my house I went, looking for the perfect rod…not too big, not too small. I was even hoping to find two different sizes because I had an idea in mind for my new creation. In the middle of my hunt, I even took a few minutes to go online and look up what these fancy needles would cost, what the best ones would be. But I did not want to wait the few days it took for them to arrive nor did I want to load up the car with the kids and drive the 45 minutes to the local yarn and crafts store (living out in the country side has some assume perks but travel time to the store is not one of them). I really wanted to try this new skill out!
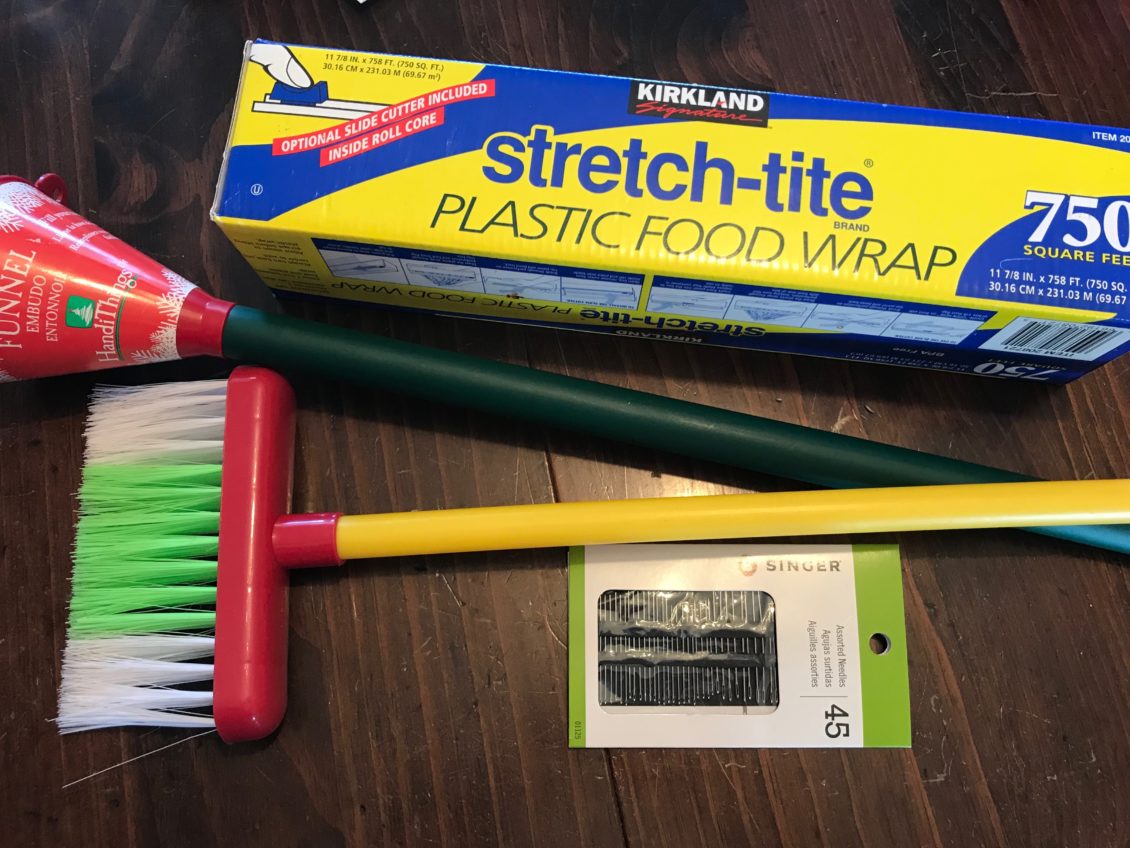
I thought about brooms in the garage and pole barn or the tree trimming rod and even the painting arm extension. Those aren’t exactly clean tools to use for this project, so they were definitely out. Then it hit me! My daughter has a toy broom and mop with removable ends! She loves using the rods for things other than their intended cleaning purposes (a sword, baton, wand, limbo pole…etc.), so maybe I could borrow one for my purpose. I got excited and hunted it down as it was not in its place with her cleaning cart (much like all her toys). In my hunt, I also came across the Christmas tree watering funnel! Another brilliant discovery! It was slightly bigger than the toy broom rod, so it would fit my purposes perfectly!
The quest was won! And I was able to begin my project that very day! It worked well and I was able to see what length of needle would be ideal for a future project if and when I decided to make a purchase of the real deal. And if I ever need something long, say for a wide broomstick stitch blanket, I know what I can use if need be.
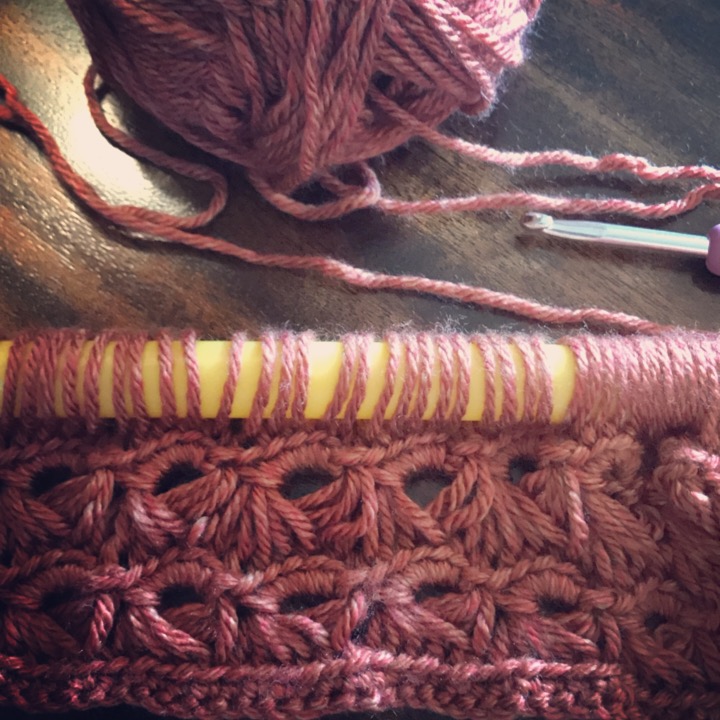
That’s just the beginning of what tools you might already have home (like your bed and some plastic wrap for blocking to give that creation it’s beautiful shape). The point is you don’t need to buy all the fancy gadgets (though they can be fun to have) in order to create something amazing! I am exceedingly proud of my broomstick and fringe shawl I made using my daughter’s toy broom and the tree water funnel!
What ways are you crafty using what you already own rather than a fancy tool?
Watch for a future post about making a broomstick lace shawl!
 Elf Point: Knit Hat Pattern
  Use What You’ve Got!
  The Crocodile Stitch: Dragon Scale Neck Warmer
  #hatnothate: The Peace of Mind Hat
  Getting Foxy in Dark
Recent Comments